Thursday, May 30, 2013

Character Animation, Topic 1: Posing

Upside down: 


This spiderman pose is relatively easy with the guidance of my tutor. He guided the class to model one side, and urge us to try out for the other side. When I've met difficulties while modeling this, I'll ask for assistance from classmates and tutor. With their help, I have no problem completing this pose.

Pose 1

Original Photo


Although this pose seems easy, but the challenge of this pose is to make the spiderman seems like having the gravity pull. In this case, I feel that i can do better for the gravity pull, as it seems to be floating in the air. I feel that the body can lean forward a little more so that spiderman will seems like it's having some weights. 

Pose 2

Original Photo


Out of the 3 poses, I am most satisfied with this pose. As I personally feel that it resembles more like the original pose, but i think i can do better at the head, the body and the hands. The head should be tilted upwards a little more, the body should be slanted a little more towards the right, and the heads moves a little more towards the left.

Pose 3

Original Photo


I am the most unsatisfied with this pose, as i feel that it can be better. It don't really resembles the photo, and it looks weird. The body should lean more towards the left leg. The left leg should bend inwards more.

The above four poses are what I have done for the posing of character animation. After finishing doing these poses, I felt a sense of accomplishment as I am not really very well versus with AutoDesk Maya. I find that character animation is fun, yet difficult. The difficult part is that I would have to decide which parts to move first then the next, in order to model out the position. I approached classmates for help when I totally have no idea how am i going to do certain poses, and after they explained to me, i slowly get the hang of it and tried it out, which also turns out to be successful. Overall, I am happy with my modelling and finds character animation interesting!

Monday, May 27, 2013

Group Project: Final Video

This is our final edited and compiled video:

Group Project 1: Cyberbully; Effects

Our team has decided on Cyberbully to work on for Project 1. We have met a lot of problems like not knowing what effects to do, and we also re-film quite a number of the scenes in order for our chosen effects to be included in. At the compiling time, I have helped in searching for sound effects and put it into the video at the suitable places, and also adjusting the duration of the sounds to suit the clips. I am also in charge of the burning of files into the CDs after everything is completed. 

The effects I have done are: 

1. 3D Reflection

This tutorial is basically teaching me how to create the illusion of having a 3D reflection text using After Effects from a 2D plane. This effect can be used on videos, or images too. The most important element is to create a shiny reflective surface, in order for the reflection to be a success. 

First step, will be creating the text area.

 Then the text layer will be duplicated, but the position of the duplicated layer would be totally upside down. It will then be soften out to make it looks like reflections. 

A solid will be created next. After which Ramp would be added to the layer. This is to blur out the reflection layer, and make it look more realistic. 

Then I will proceed on to create a solid which is meant for the background.

Then another bigger solid is being created, as being rotated like a 'floor', after which, grids are being added.

After that, text will be added into the composition, but reflection part is being cut away. 

Hence, a divider layer is being added in between the grid and text layer, so that the reflection text can be shown. A camera is being added into the composition, so as to move the scene and make it looks 3D.


2. Old Film Looks

This effect is basically making the clips looks like it is being shoot in the past. This effect can be good when we want to make the clip looks old. This effect is more of combining two videos into one and do color corrections to make it looks old. 

The original footage. 

This is when the 'Real_8mm_film' is being added in. It makes the whole clips looks a little dull.

Then an adjustment layer is being added in. This is where the Hue/Satuation is being added in to make the clip looks brownish. After which, an Ellipse Tool is being added in as the mask. This is to blur out the surrounding slightly and focus more on the two characters. 

3. Smoke Screen

This effects teaches me how to composite and animate smoke elements in 3D space. From this tutorial video, I also know that actually we can animate images and not only movies clips in After Effects.

The smoke element photoshop file is being included in the 'Smoke" composition. After which a white solid is being added. After which the photoshop file is being hidden. An adjustment layer is added with 'colorama' effect and 'turbulent displace'. 'Colorama' is to mix the colour of the smoke, whereas 'turbulent displace is to animate the smoke, so that it can be rotated when the timeline moved one seconds. 

Then we created a new composition, added in the background image. Added the effects of 'Invert' and 'Curves' to make the background a little greyish. 

After which, I put in the smoke element into the composition then I start to rotate the smoke element in different directions. More smoke elements is being added and rotated. 

Then a Camera and a Null Object is being added. The addition of Null Object in order for the Camera to have things to track, and after confirming the Camera movement, I can know where to add more smoke elements to make it looks better. 

Then text is being added in. It is them being transformed to a 3D layer, so that it can move when the moved too. 

An adjustment layer is added for 'Curves' effect. This is to make the clip looks a little greyish-blue.


Week 1 Tutorial 1

Exercise 1


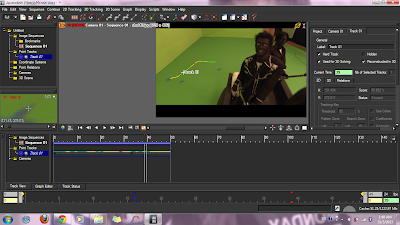
Through this tutorial, I know that video tracking will first be done in MatchMover, before exporting it to AutoDesk Maya to place in the 3D object, or locating the working plane. The 2D line indicates the quality of the points being tracked. 

Exercise 2

The first photo is to track the crosses in the background.

Adding feel more tracking points.

Turns the tracking points into 3D scene.

And this is to render out the scene.

Sunday, May 5, 2013

Group Work: Ideation for Project

Group Members

  1. Valarie Tan
  2. Tricia Sim
  3. Jolene Khoo
  4. Jacqueline Oh
The three ideas we came up for the project are:

  1. Cyberbully
  2. Twitter safety
  3. Internet fraud

Internet Fraud
The idea is that this woman she received an email stating that she won 1 million. And then she start thinking about what she can do with the money. However, she later realised that it was a fraud. The other party couldn’t be contacted and was an untraceable email address.

Twitter safety
With the progression and advancement of technology today, the use of social media has become an uprising trend for many users. With the influence of friends and people around her, a young female teenager decided to try twitter. She set up an open account and starts to ‘follow’ people around her as well as gaining followers. All is well until she receive constant Direct Messages from someone she doesn’t know.

Cyberbully
There is a clique of friends who used to be very close together, until a guy in the group got attached to a girl in the same class. Both of them sticks to each other everyday, and was very loving even when they were in school. Their classmates detested their actions and secretly discussed about them when they weren’t around. Later, they even created a blog to talk about the couple, and soon the blog gone viral.

Group Presentation

Question: 
What are some important factors in matchmoving, ie. what factors contribute towards a successful or unsuccessful matchmove?